
Installation Guidelines
Installation for Windows and UNIX
Hardware devices required installing Esterel Studio
Installing, Configuring and Starting on Windows
Installing, Configuring and Starting on UNIX
Managing License Files and Tokens
Introduction: A Token License System
Asking for and Installing License Keys on Windows (adm. task)
Asking for and Installing License Keys on UNIX (adm. task)
Configuring User’s Environment on Windows and UNIX (user task)
Installing or updating Esterel Studio plug-ins
CD-ROM Content
Esterel Studio Distribution
The following applications are delivered on your Esterel Studio CD-ROM.
|
Applications for Windows and UNIX |
Description |
|
Esterel Studio Features |
The Esterel Studio application modules, as described below. |
|
Esterel Technologies License Server |
Esterel Technologies products use the FLEXnet license manager from Macrovision Corporation for product license administration. The FLEXnet license server must be installed on your Local Area Network. Refer to “Managing License Files and Tokens”. |
|
Adobe Acrobat Reader |
Allows you to read the PDF files included on your CD-ROM. See http://www.adobe.com/products/acrobat/readstep2.html for more information on Acrobat Reader. |
Esterel Studio Features
· Esterel Studio Editors (Textual Esterel, State Machines, Architecture Diagrams)
· Esterel Studio Simulator & Source Code Coverage
· Esterel Studio Design Verifier & Sequential Equivalence Checker
· Esterel Studio Code Generators (VHDL, Verilog, C, C++, SystemC)
· Esterel Studio Testbench Generators
· Esterel Studio Model Reporter
· Esterel Studio ECO and Traceability Module
· Esterel Studio Executable Specification Exporter & Player
· Esterel Studio Parametric IP package Exporter & Generator
· Esterel Studio SPIRIT exporter
· Esterel Studio Model Info
· Early Performance Estimator
Esterel Studio Documentation
The documentation is available in PDF format (in the /doc directory) and in HTML format through the Help menu of Esterel Studio.
Open MANUALS.htm to get the list of all manuals.
If you are upgrading from a previous version of Esterel Studio you should read the Release Notes first.
Installation for Windows and UNIX
Installing Esterel Studio requires installing a license server either on a network server (preferred) or on your local computer. More details in “Managing License Files and Tokens”.
To increase performance, install Esterel Studio on your local computer, even if your license server is on a remote server.
Hardware devices required to install Esterel Studio
|
CPU Processor |
1 GHz or faster |
|
RAM |
256 Mb minimum, 512 Mb recommended |
|
Disk Space |
120 Mb minimum on Windows, 250 Mb minimum on UNIX |
|
Peripherals |
CD-ROM drive for installation |
|
OS (*) |
Windows 2000 SP4, Windows XP SP2, |
|
Protocol |
Network adapter and TCP/IP installed and configured for license management |
|
Display |
65000 colors, 17-inch recommended |
|
PC X-Server |
No X-server is supported to run Esterel Studio for Unix/Linux on a PC. |
(*) Bold characters indicate the OS on which Esterel Studio has been compiled. Tests have been performed on the other ones to make sure all Esterel Studio tools supports them.
Installing, Configuring and Starting on Windows
Before installing Esterel Studio you should make sure that Microsoft Visual C++ NET 2005 is already installed, if you plan to use the simulator.
Installing on Windows
- Login as administrator.
- From the CD-ROM, run es_setup.exe, the Esterel Studio installation program.
NB: If you encounter problems during setup, uninstall and re-install your application.
Configuring on Windows
- Set your ESTERELD_LICENSE_FILE environment variable.
The FLEXnet License Server can be installed either on a network server (preferred) or locally on your own computer. See the table below for instructions.
FLEXnet License Server installed on |
|
|
Your computer |
A network server |
|
The installation sets ESTERELD_LICENSE_FILE to the path of your ESTERELD.lic file. |
Change your environment variable ESTERELD_LICENSE_FILE to this value: <PortNumber>@<ServerHost> <PortNumber> is the free TCP port number specified in the license file, e.g. 29030 <ServerHost> is the name of the computer where the FLEXnet License Server is installed. |
To set ESTERELD_LICENSE_FILE environment variable, you can:
- Click on Start>Settings>Control Panel,
- Double-click on System icon,
- Select Advanced panel and click on Environment Variables button,
- Create or edit ESTERELD_LICENSE_FILE and write correct value (see table above).
- Restart your computer at the end of the installation process.
ESHOME and ESTEREL are set automatically to the installation directory. If you have a previous installation of Esterel Studio you will need to reset these variables by hand to switch to the previous installation.
Starting Esterel Studio on Windows
To start the application you can either:
- Click on Start>Programs>Esterel Studio>Esterel Studio.
- Double-click on one of the Esterel Studio project files (.etp file).
Troubleshooting incorrect settings for Visual C++ NET 2005 on Windows
Symptoms of incorrect settings are:
- Warning messages during installation (for example: “C++ was not detected”)
- Compilation failure (MS compiler not found).
- Start the Microsoft Visual C++ GUI to update the Windows registry then close it.
- Go to the Environment Variables area from Start>Settings>Control Panel>System>Advanced tab in order to check the variables listed in the following tables.
|
System variable |
Value for MSVC++ NET 2005 |
|
DevEnvDir |
C:\Program Files\Microsoft Visual Studio 8\Common7\IDE |
|
Path |
C:\Program Files\Microsoft Visual Studio 8\Common7\IDE;C:\Program Files\Microsoft Visual Studio 8\VC\BIN; C:\Program Files\Microsoft Visual Studio 8\Common7\Tools;C:\Program Files\Microsoft Visual Studio 8\Common7\Tools\bin; C:\Program Files\Microsoft Visual Studio 8\VC\PlatformSDK\bin;C:\Program Files\Microsoft Visual Studio 8\SDK\v2.0\bin; C:\WINDOWS\Microsoft.NET\Framework\v2.0.50727;C:\Program Files\Microsoft Visual Studio 8\VC\VCPackages;... |
|
INCLUDE |
C:\Program Files\Microsoft Visual Studio 8\VC\ATLMFC\INCLUDE;C:\Program Files\Microsoft Visual Studio 8\VC\INCLUDE; C:\Program Files\Microsoft Visual Studio 8\VC\PlatformSDK\include;C:\Program Files\Microsoft Visual Studio 8\SDK\v2.0\include |
|
LIB |
C:\Program Files\Microsoft Visual Studio 8\VC\ATLMFC\LIB;C:\Program Files\Microsoft Visual Studio 8\VC\LIB; C:\Program Files\Microsoft Visual Studio 8\VC\PlatformSDK\lib;C:\Program Files\Microsoft Visual Studio 8\SDK\v2.0\lib |
|
LIBPATH |
C:\WINDOWS\Microsoft.NET\Framework\v2.0.50727;C:\Program Files\Microsoft Visual Studio 8\VC\ATLMFC\LIB |
Installing, Configuring and Starting on UNIX
Installation procedure must be performed entirely before running your application.
Mounting the CD-ROM (adm. task)
Mount the CD-ROM into the drive.
Creating the installation directory (adm. task)
The following applies for first time installation only.
- In
order to remove write permission for the group and others, set the umask (read/write/execute
permission management) as follows:
umask 022 - Go to
a disk directory for which you have write access by using a cd command.
Make sure you have enough space available on this disk partition to install all products. No file will be created outside this directory. - Create
a sub-directory as follows:
mkdir <prod_install_dir> - Switch
to the installation directory
cd <prod_install_dir>
Extracting the Esterel Studio archive
Extract the Esterel Studio archives: (<cdrom> depends on the network and system configuration e.g. /cdrom/solaris)
gzip -dc <cdrom>/es_setup.tgz | tar xvfo -
Unmounting the CD-ROM (adm. task)
Unmount the CD-ROM and eject it.
Configuring your environment (user task) on UNIX
Set the environment variables in each user’s "start-up" file (.profile or .login).
To do so, refer to the following tables.
|
Variable |
Bourne-like shell: sh, ksh, zsh or bash |
Comment |
|
ESTERELD_LICENSE_FILE |
ESTERELD_LICENSE_FILE=
|
<PortNumber> is the free TCP port number specified in the license file, e.g. 29030 <ServerHost> is the name of the computer where the FLEXnet License Server is installed. |
|
ESHOME and ESTEREL |
ESHOME=<prod_install_dir>; ESTEREL=$ESHOME;export ESHOME ESTEREL |
These variables are required on UNIX. |
|
PATH |
PATH=…:$ESHOME/bin:$PATH; export PATH |
Put the C compiler in your path in order to run simulations. |
|
LD_LIBRARY_PATH |
LD_LIBRARY_PATH=$ESHOME/bin:$LD_LIBRARY_PATH; export LD_LIBRARY_PATH |
Required to call binaries other than estudio and esterelv7. |
|
Variable |
csh-like shell: csh or tcsh |
Comment |
|
ESTERELD_LICENSE_FILE |
setenv ESTERELD_LICENSE_FILE <PortNumber>@<ServerHost>
|
<PortNumber> is the free TCP port number specified in the license file, e.g. 29030 <ServerHost> is the name of the computer where the FLEXnet License Server is installed. |
|
ESHOME and ESTEREL |
setenv ESHOME <prod_install_dir>; setenv ESTEREL $ESHOME |
These variables are required on UNIX. |
|
PATH |
setenv PATH …:$ESHOME/bin:$PATH |
Put the C compiler in your path in order to run simulations. |
|
LD_LIBRARY_PATH |
setenv LD_LIBRARY_PATH $ESHOME/bin:$LD_LIBRARY_PATH |
Required to call binaries other than estudio and esterelv7. |
The following environment variables are optional and should be set to overwrite the defaults:
|
Variable |
SunOS Default Command |
Linux Default Command |
Comment |
|
CC |
cc |
gcc |
To compile C files for simulation |
|
LPR |
lp |
lp |
To print files |
|
EDITOR |
emacs |
emacs |
To edit text files |
|
PDFVIEWER |
acroread |
acroread |
To view PDF files |
|
RTFVIEWER |
abiword |
abiword |
To view RTF files |
|
NAVIGATOR |
netscape |
mozilla |
To view HTML files |
Checking your system on UNIX
- You can check your system with the es_check_system command line.
- Check that no package is missing for Esterel Studio.
Starting Esterel Studio on UNIX
- Start Esterel Studio with the estudio command line.
- Browse the online documentation.
Managing License Files and Tokens
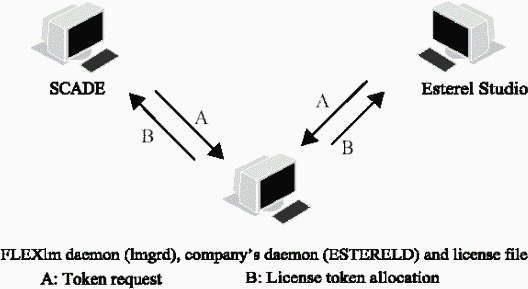
Introduction: A Token License System
Esterel Technologies uses the FLEXnet token license manager
from Macrovision Corporation for product license administration.
License tokens control simultaneous executions of a given product (SCADE,
Esterel Studio or both) installed on a network of UNIX and /or Windows machines
(see picture below). When there are not enough license tokens available, access
to the application is denied.
To purchase new licenses or request a demo license, please contact our customer representatives at sales@esterel-technologies.com.
A FLEXnet End User Manual is included on your CD-ROM in PDF format.
Esterel Technologies products are controlled by a software
daemon (ESTERELD).
This vendor daemon runs under the control of a main FLEXnet software daemon
(lmgrd), on one-single or three-redundant physical server(s).
Asking for and Installing License keys on Windows (adm. task)
Asking for license keys on Windows
- Login as administrator.
- From the CD-ROM, run the install program flexlm.exe.
- Select the entry request.txt from Start>Programs>Esterel Technologies License Server. This pops up a “request.txt” file.
- Send this “request.txt” file to support@esterel-technologies.com or fax it to: +33 4 92 02 54 56.
NB: Don't forget to indicate where, on the IP subnetwork (e.g. 192.10.*.*) licenses will be floating. Client machines (on which Esterel Technologies applications run) should have an IP address included in that range.
Installing license keys on Windows
- Login as administrator.
- Copy and paste the license keys you received to the ESTERELD.lic file in Start>Programs>Esterel Technologies License Server>ESTERELD.lic.
- Save the license keys.
- Launch the FLEXnet LMTOOLS from Start>Programs>Esterel Technologies License Server.
- Select Configuration using Services and Esterel Technologies License Server from Service/License File tab.
- In
the Config Services tab, make sure both Start Server at Power
Up and Use Services options are checked.
You can also start or stop the FLEXnet server manually from the Start/Stop/Reread tab. - Restart your computer after installing your application and FLEXnet.
NB: The Server Diags tab helps you diagnose problems quicker.
Asking for and Installing License Keys on UNIX (adm. task)
Asking for license keys on UNIX
- Choose the directory where you will store Esterel Technologies Licenses Server.
- Example: /usr/local/ET_FLEXnet. We name it: <ET_FLEXnet>
- Extract the Esterel Technologies License Server archives: (<cdrom> depends on the network and system configuration e.g. /cdrom/solaris)
cd <ET_FLEXnet>
gzip -dc <cdrom>/estereld.tgz | tar xvfo -
- Prepare the license request:
cd <ET_FLEXnet>/estereld
./install.sh
- Accept the default choice for installation directory ('pwd')
- Type in your name, fax number, e-mail address, company name and your contract number
- Send the “request.txt” file to support@esterel-technologies.com or fax it to: +33 4 92 02 54 56.
NB: Don't forget to indicate where, on the IP subnetwork (e.g. 192.10.*.*) licenses will be floating. Client machines (on which Esterel Technologies applications run) should have an IP address included in that range.
Installing license keys on UNIX
- Insert
the license keys you received in the file:
<ET_FLEXnet>/estereld/ESTERELD.lic - Start
your license server:
cd <ET_FLEXnet>/estereld
./esterel.sh start
NB: The ./esterel.sh diag command line helps you diagnose problems quicker.
Configuring User’s Environment on Windows and UNIX (user task)
In each user environment, the ESTERELD_LICENSE_FILE
variable must be set. This variable refers either to a license file on a user machine
or to a TCP port on a license server.
Refer to “Installing, Configuring and
Starting on Windows” or “Installing,
Configuring and Starting on UNIX”.
Installing or updating Esterel Studio plug-ins
Plug-in definition
Plug-in is the primary means of executing script files
directly from Esterel Studio.
Plug-ins are launched by Tools> Plug-in> <plug-in_name> from Esterel Studio menu.
For more information on Plug-Ins, please read the Defining Plug-Ins Section
from the Esterel Studio User Manual.
Predefined plug-ins are provided in Esterel Studio delivery:
- Displaying generated code,
- Displaying logs,
- Executing Makefile,
- Post processing generated HDL files,
- Visualizing waves with Modelsim,
- ...
Plug-in installation
Predefined plug-ins are automatically available when you install Esterel Studio for the first time.
This is not the case for updates and manual installation must be performed.
Two ways are described in the following paragraphs.
Installation of plug-ins by the import command
To import the plug-ins package:
- Select Tools>Preferences and click the Plug-in tab,
- Click the Import button, it opens an explorer,
- Select for Windows, "%ESHOME%\lib\plugin.dat" file,
- Select for Unix, "$ESHOME/lib/plugin.dat" file,
- Remove all duplicated plug-in lines using Remove button.
Installation of plug-ins with text editor
Do the following actions to add the plug-ins lines in your existing plugin.dat:
- Check that Esterel Studio is not running,
- Open, using textual editor, plugin.dat located at:
- "%ESHOME%\lib" directory for Windows,
- "$ESHOME/lib" directory for Unix,
- Copy each group of four lines you need (starting with [NAME], [COMMAND], [KEEP_OPEN] and [BACKSLASH]),
- Paste them into your personal "plugin.dat" located at:
- "C:\Documents and Settings\<login>\Application Data" directory for Windows
- "/home/<login>" directory for Unix
- Save "plugin.dat" file, all new plug-ins are added in your plug-in configuration.
The use of Esterel Studio
software is governed by the conditions defined on delivery of the license
agreement.
Esterel EDA Technologies gives no guarantee concerning the use of these programs.
Copyright© Esterel EDA Technologies 2008 - All rights reserved to Esterel EDA Technologies
Esterel Studio is a trademark registered by Esterel EDA Technologies
www.esterel-EDA.com
Support E-mail: support@esterel-technologies.com